
Dramatic Portrait Editing (Morgan Freeman’s Twin)
I took this photo a while back but found it recently when searching for some other related photos. I had almost forgotten about it but knew that it would work perfectly for a dramatic editing project. After I completed the photo I thought that some people may enjoy seeing how I completed the edit. So here it is step by step and layer by layer. What I did was begin at the first layer and activate each layer on top of it. You can see which layer is active by the ‘eye’ symbol to the left of the layer. If you aren’t familiar with Photoshop then you may want to just skim the text and look at the photos…. Enjoy!

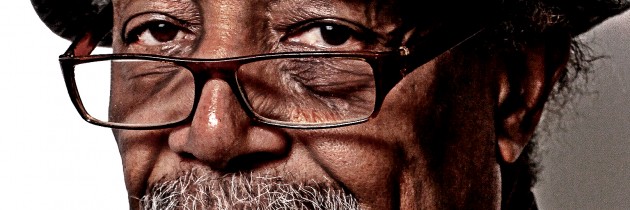
Here is the completed image with my watermark on it.

Here is the beginning image. This is a photo that I took while doing a catalog shoot. He came by and I captured some shots when I had a moment. I used a really simple single light setup which helps bring out depth in his features. I actually edited it and cropped it before beginning this process. This is the time to get any particulars right about the photo that you are going to edit. It is best to choose a photo that has a lot of character to it. Wrinkles that are well lit really work well. What I am doing after all is accentuating, or over accentuating, what is naturally there.

Make a duplicate layer and name it ‘background copy’. Adjust the ‘Shadows and Highlights’. Not sure what my settings were but you would have your own settings anyways since every photo will be different.

Create an adjustment layer and adjust the levels to saturate the image.

Open a new layer and merge all of the active layers into it using ‘Shift+Control+Alt+Command’. Then desaturate the layer.

Create a new adjustment layer and adjust the levels to overexpose the image. Then merge the effects again into their own layer.

Invert the image and run a Gaussian Blur on it. Apply an Overlay blend mode to the layer and adjust the opacity to suit it.

Create a new layer and set it to ‘Overly -Neutral’ and fill with 50% gray. Then you can begin dodging and burning with a soft white brush and a black brush. I like to use a really low opacity and work the details. Here is where it really comes together and where you can spend a lot of time. You want to get into the face and darken every wrinkle and then lighten every highlight.

I created a new layer and then merged all of the layers into the new one. Then I placed the burn and dodge layer on top of the last layer which doubles the effect. It was a little too much so I lowered the opacity until it looked right.

Here it is with the opacity adjustment. Then for the final layer I adjusted the saturation and increased it slightly to let the skin breath a bit more.

Then after merging the visible layers I added my watermark. I actually cloned a spot on his right cheek to decrease the magnification through his glasses. I should have taken care of it at the beginning but I didn’t remember to edit it. It’s something that naturally occurred but I found it distracting as I kept looking at it. I dont usually take out things that are naturally there but if they are distracting I’ll alter them.
Let me know if you have any questions. Please comment if you like it and have found this helpful.
Hope that you enjoyed this!
Related Posts via Categories

