
In A Silent Way -Sound Blimp Project
Rebekah and I have always loved movie stills that are done on the set during the shooting of films. While on the set of The Hunger Games we saw how the head photographer was able to silently capture shots even while they were filming. I then learned about sound blimps that enabled photographers to shoot without the shutter sound. After some research I found out that Jacobson Blimps have been the case of choice on sets and although there are a few viable alternatives now they are still extremely popular.
Here are a few tutorials that I learned from. What I did was take the best points of construction from each tutorial and work on my own. If you are going to make your own I would suggest reading mine as well as each of them over since they all have some great points about them.
http://silentpenguin.blogspot.com/2010/07/blimp-20.html
http://photographylot.blogspot.com/2010/02/diy-sound-blimp.html
http://www.picturedujour.com/2008/05/30/how-to-make-a-sound-blimp-for-your-camera/67
After reading these over a bunch I went about sourcing the parts and making my first sound blimp. It turned out well and was usable but it was not that refined. After the learned experience of making that first one I identified the weak points and thought about how I could engineer a better blimp. After redesigning it in my head I kept my eyes open while I was sourcing parts for the new one.
I always get in the groove when I am doing a project that I neglect to take photos documenting each stage. So here is my attempt to document my construction of a new sound blimp. I apologize for the skipped steps and missing shots! Just write if you have any questions.
Here is a photo of my original:


My design weakpoints were the front glass, the sloppy adhesion of the lens tube to the body and the hole that I had to drill and fill for the trigger. I liked the clean lines that I got for the viewfinder hole and was glad that I made it large enough to see the screen and not just the viewfinder as some of the tutorials did. I actually made it a little larger the second time around.
Here is a photo of almost all of my parts and tools needed for the project.

As others discovered, I also found that the Pelican 1150 case was the best fit. It even looks a lot like the classic Jacobson Blimp. Here is a shot of a photographer using a Jacobson. http://michaelseto.blogspot.com/2008/09/life-on-set-part-ii.html

Parts list:
-95mm UV Filter (Hoya, but others work)
-3″ to 2″ Black UBS Pipe (much better to use black UBS pipe instead of white PVC painted black since the paint on the PVC will eventually chip)
–Lexan Glass (found at Lowes)
-Drill with various bits
-Hacksaw
-Wood Saw
-PVC Glue
-Gorrilla Super Glue
-Gorilla Glue
-Clamps
-Soldering iron
-Dremal, with sand paper bits
-Wireless Trigger (I used an Opteka)
-Velcro for the trigger
I found most of this at Lowes although I had to order some parts though.

First I cut out the foam to fit my Canon 5D mark ii. This was similar to my first Blimp but I centered the camera more due to the fact that I had to mount the wireless receiver to the left side of the camera. You can use toothpicks to mark where your edges of the camera are before you pull out the squares of foam.

Then I marked where the center of the lens will be and put a cutout where I would need to cut.

Dremel a small hole then make it larger by using a larger bit.


Then I marked the inner ring of the lens tube to the outside of the case.

Instead of using a large hole drill I just mounted a pencil to the dremel at the correct distance and made my circular cut.

Cleaned it up with the dremel with a sandpaper bit.

Once I determined the correct fit I was ready to cut the threads to the correct length. It was good that the tube had threads on it. I feel like it give it a snugger fit when I screw it on

I used a saw and miter box to make the cut.

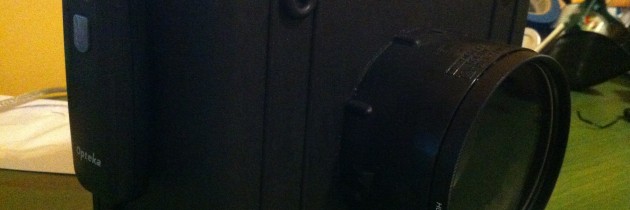
Here it is shown that I achieved the nice and clean lines. Here it bears mentioning how this really improved on the previous blimp. By using a 2 step UBS tube I was able to make a smaller hole that opened up to a larger opening to fit the filter. This served a dual purpose of making the lines cleaner and it made for a tighter fit which would be even better sound dampening. I did make the choice when choosing this tube that this blimp would house cameras due to the size would work only with prime lenses or lenses that were small enough to fit in the tube. The 50mm 1.4, 1.8 or 1.2, 35mm, or even the 85mm fit in the lens tube. It is actually not that limiting since once the camera is in the case you can’t use the zoom anyway. I really like shooting with primes as well.

Here I am fitting the 95mm Hoya filter into the lens tube. I highly recommend purchasing a filter. I got one on clearance from Biggs http://biggscamera.com for a great deal but I also saw that you can find some off brand filters online quite cheap. This is also a major part of how I made this one much better than the last. On my previous model I cut some Lexan for the front. The UV filter is clearer and more scratch resistant. The Lexan works ok but it is hard to cut into a perfect circle and to adhere it to the lens tube I used UBS glue and it wasn’t that clean. Anything you can do to have it look cleaner and more professional the better it will look and sound. You want to be invisible and sound invisible after all.

Here I used the PVC glue to form a good seal of the tube to the body. I know I just said that its best to keep it clean but this is the inside and will never be seen.

Just traced the outline of the screen and the viewfinder.

Just put the cutout of the screen on it with and tape on the back and it will show you exactly where you have to cut for the screen.


-Use the clamp and some guide wood to dremel some straight lines.

This Lexan which you can pick up at Lowes works great for the screen. I kept it wide so I would be able to apply plent of glue which helped the adhesion and sound proofing.

Keep the film on one side so you can put sufficient pressure on it and glue it down.


Then the cutout in the foam for the screen and its ready for the camera.

I then mounted the wireless trigger to the outside of the case using some velcro. This was another improvement on the previous model. By going wireless I didn’t have to drill another hole. The less holes the better. Wireless triggers aren’t that more expensive than wired so it is definitely worth it.
 Here it is finished. Really happy with the results.
Here is a video showing a few of the building steps.
So far I have used it for a few shoots. It worked great photographing the conductor at the Charlotte Symphony. I could shoot right next to the ushers and they never said a word. Cant get much quieter than that!
Hope you enjoyed this and that it may help you make your own.
Related Posts via Categories


Really liked what you had to say in your post, In A Silent Way -Sound Blimp Project | Charlotte Photography, thanks for the good read!
— Everett
http://www.terrazoa.com
Hi, just wanted to say i liked this article. it was practical. keep on posting.